Google Tag Manager (GTM) is an essential tool that allows you to manage and deploy marketing tags (snippets of code) on your WordPress website without modifying the underlying codebase. Whether you’re tracking analytics, adding conversion tracking, or integrating third-party scripts, GTM simplifies the process. In this blog post, we’ll walk you through the steps to insert the GTM code in two places: the header and just after the opening body tag.
Step 1: Get Your Google Tag Manager Code
- Log in to Google Tag Manager.
- Create a container for your website.
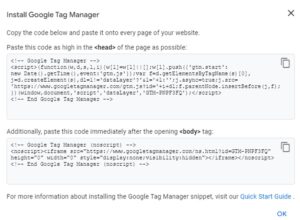
- Copy the two code snippets GTM provides:
- One for the header section.
- One for after the opening
<body>tag.
Step 2: Insert GTM Code in WordPress
Option 1: Using a Plugin (Easiest Way)
- Install a Plugin:
- From your WordPress dashboard, go to Plugins > Add New.
- Search for Insert Headers and Footers and install it.
- Insert the Code:
- Go to Settings > Insert Headers and Footers.
- Paste the first snippet (for the header) into the Scripts in Header box.
- Paste the second snippet (for after the body) into the Scripts in Body box.
- Click Save.
Option 2: Manual Method (For Developers)
- Add to Header:
- Go to Appearance > Theme File Editor.
- Find header.php and paste the first snippet right before
</head>.
- Add After Body:
- In the same header.php file, find the
<body>tag. - Paste the second snippet immediately after
<body>.
- In the same header.php file, find the
Step 3: Test It
Use the Tag Assistant Chrome Extension to check if your GTM code is working.
Subscribe to Our Blog with your email (Is it too much too ask?);